NetStores FrontPage E-Commerce Add-Ins
Setting up your online Web store
If you have not already done so, open a site in FrontPage. From FrontPage you can set up an online Web store that uses NetStores FrontPage E-Commerce Add-Ins.
Step 1: Signing-Up (top)
If you have not already Signed-Up for an account at NetStores, you must do so before you can continue to set up your store. To sign up at NetStores from within FrontPage, choose
NetStores E-Commerce > Sign Up (see picture).
You will be taken to the NetStores Web page where you start the sign-up process, called NetStores' Terms of Service. If you agree to the terms of service, press the I Agree Button, and fill in the Set-Up-Your-Account form (see picture), following the instructions on the form.
After filling in the form, click Create Your Store and NetStores will take you to the Merchant Administration Area. We will come back to this area in Step 6. Go back to FrontPage for Step 2.
Step
2: Enter your
Merchant ID and Password (top)
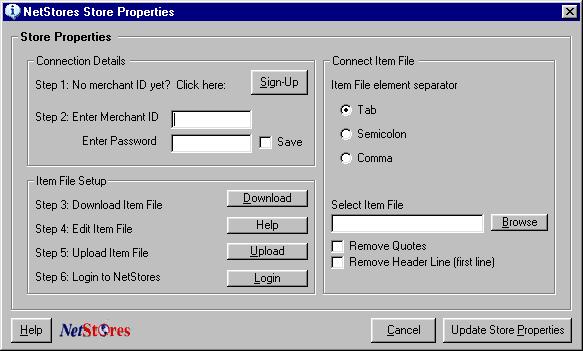
Back in FrontPage, open the NetStores-Store-Properties dialog box by selecting NetStores E-Commerce > Store Properties from the menu bar (picture below).
The NetStores-Store-Properties dialog box, shown below, displays parameters
that are important for using your online store with NetStores and helps
you complete Steps 1-7.

Merchant ID entry - Very Important! (top)
Of ultimate importance in the NetStores-Store-Properties
dialog box is the Merchant ID entry box. You must type in the Merchant
ID you chose when you signed-up at
NetStores. If you do not remember what you chose, check your e-mail. By
inputting the right Merchant ID in this dialog box, you provide to all
the NetStores objects (such as the Add-to-Cart button) the information
they need to operate correctly. The correct Merchant ID is critical for
proper performance.
Password (top)
Type in the password you used when you signed-up at NetStores. If you do not remember what you chose, check your e-mail.
Each site can have its own merchant ID, password and configuration, simplifying the process for professional Web designers of creating multiple E-Commerce-enabled Web sites.
Continue to Steps 3, 4, 5 - Item File (top)
The NetStores item file holds a list of all the items or services offered on your company's Web site. In the dialog box shown above, many of the remaining buttons and entries involve the item file. Follow the instructions for downloading, editing and uploading the item file at this link.
|


